Feedback please!!!Click here for ur feedback!

Wednesday, August 29, 2012

Codename8-The Best Rom for gaming


This rom is only for Gingerbread and NOT ICS
Based on stock .62 firmware..
This rom is cooked for daily use, aiming for stability, superfast, multitasking..
and better gaming..
also for the enjoyment of music..


Requirement:
  • must be on unlocked bootloader
  • firmware 4.0.2.A.0.42/62
  • baseband 70/72 will works too but not recomended
  • use the recomended kernel for the rom to get full performance
  • please do not use task killer or anything like that
  • do not add other tweak or script as it will break the rom configuration

Features
  • Walkman + VolumePlus + Beats Audio
  • lightwieght, slim & trimmed
  • FPS uncapped - up to 72fps
  • GPU oc - only with experimental kernel
  • adblocker
  • odex script included optional
  • 64Mb zram
  • better ram management - multitasking
  • 3G & Network speed enhanced - no battery drain
  • Wifi speed optimized - with dual-band enabled
  • various tweaks for performance - after a lot of testing
  • Statusbar Widget 
  • no compression on modded apps
  • and of course, battery friendly 

Installations

Unlock Bootloader-here
Kernel-here
Night-elf v9.6 exp lite is recommended
Flash kernel-here
Instructions

1. Download the rom & put it on your sd card
2. Do a full CWM backup of your current rom
3. Reboot into recovery
4. Wipe data/factory reset
-wipe cache partition,
-wipe dalvik cache
-wipe battery stats

5. Go into Mount & storage
-Mount data (It will change from "mount /data" to "unmount /data")
-Then mount system (It will change from "mount /system" to "unmount /system")

6. Format cache
-Format data
-Format system

***DONE FORMATTING***

7. Install downloaded zip file (codename_ei8ht_final.zip) by selecting 'Install custom zip' option
Then browse to choose the main rom and of course scroll down to yes.

***ROM FLASHING DONE***

8. Reboot into phone
9. When phone boots up, complete SETUP or you might have issues with 'Accounts and Sync' (I DID - HAD TO REFLASH)

10. Reboot the phone again (Convienient option already added when you hold down power button).

NOW ENJOY CODENAME 8!!!


Screenshots


Here is the link for the Rom-here

If you are having any trouble installing or after installation, please leave a comment below. I'll always be there to help you.
Akash
About the Guest Author:
My name is Akash and I love to experiment with my mobile.I also love
soccer!

Guide to flash Xperia Pureness ICS based ROM on Xperia Neo V with both locked and unlocked bootloader

Steps for Unlocked Bootloader

Requirements:

1. Bootloader Unlocked
(See http://sonyxperianeov.blogspot.in/2012/06/bootloader-unlocking-via-easiest-way.html to unlock the bootloader)
2. Flashtool installed on your PC
(Click http://www.mediafire.com/?p65m2hqq0t5cls3 to install Flash tool for your Xperia)
3. ADB Drivers should be installed on your PC.If the drivers are not installed, Install Flashtool on your PC, open C:\Flashtool\drivers and click on the exe file to install drivers.


How to install:

Prerequisites:

1. Download ROM from :
http://www.mediafire.com/?6jncx5wenfmz9
Download Xperia_Ice_Cream_Pureness_build_11.00.zip 
2. Download patch for Neo V- http://www.mediafire.com/?3a2rjztad28i305

2. Download Suave V6 Kernel(IMG file) from :
http://www.mediafire.com/?3ucv20pubc7c2um


Steps:


1. Shutdown your phone and hold on the right button on phone while inserting USB cable, Blue LED will start to blink
2. Open Flashtool and click on thunder icon
3. Click on Fastboot and click 'OK'
4. Click on 'Select Kernel to flash'
5. Browse and click on the SuaveV6Neo.img (or night elf) and flash.
6. Safely remove fastboot from PC.
7. Power on mobile.
8. Enter in to CWM recovery mode (Press volume - button just after Sony Logo)


Now carefully follow the steps....


(for both locked & unlocked boot loader phones,follow it precisely )
Note:
 You must have Downloaded Xperia_Ice_Cream_Pureness_build_11.00.zip & the patch for your phone model from mediafire folder.

1.Factory reset in cwm
2.wipe cache partition
3.wipe dalvik cache
4.Format /system (in mounts and storage
)
5.Format /cache
6.Format /Data
7.Install Xperia_Ice_Cream_Pureness_build_10.00.zip
8.Install patch for your phone model
9.Reboot now
and you are done !

After flashing let the phone settle down for 1 hour at least before starts to play with it

+.When low on ram/phone starts to lag use Adrenaline boost.Open terminal emulator.Type Su and press enter.Give super user permission.Now type boost and press enter.It will boost your ram up.Also reboot your phone at least a day to get rid of the lag,this is mainly due to the way android system makes cache 


Your ROM is now installed...

Enjoy Xperia Pureness ICS based ROM....
 

Steps for Locked Bootloader

Requirements:

1) Take a Nandroid backup of your current ROM and Titanium backup of your data and apps( See http://sonyxperianeov.blogspot.in/2012/05/how-to-take-nandroid-backup-of-your.html to take Nandroid backup of your phone)
2) Export contacts to SD card for backup
3) Must have CWM recovery installed ( See http://sonyxperianeov.blogspot.in/2012/05/how-to-take-nandroid-backup-of-your.html to install CWM recovery)


 Prerequisites:

1. Download ROM from :
http://www.mediafire.com/?6jncx5wenfmz9
Download Xperia_Ice_Cream_Pureness_build_11.00.zip 
2. Download patch for Neo V- http://www.mediafire.com/?3a2rjztad28i305

Steps for installation:


1. Reboot your phone
2. Enter in to CWM recovery mode (Press volume - button just after Sony Logo)
3.Factory reset in cwm
4.wipe cache partition
5.wipe dalvik cache

6.Click on choose to install Zip from Sd card
7. Select the Zip file downloaded and select 'Yes'
8. Install the patch also like this

9. Done! Your ROm is now installed.


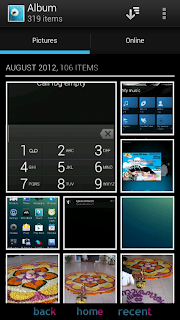
Screenshots:


Gallery:

Can change the thumbnail size with a drag to right and left


Jayakumar
About the Guest Author:
Jayakumar is the admin of the blog Sony Xperia Neo V

Sunday, August 26, 2012

Steps for Flashing a Kernel

You need not wipe anything to flash a Kernel on your phone. A Nandroid backup is reccommended however.

Requirements:


1; Flashtool ( Link to download is : http://www.mediafire.com/?p65m2hqq0t5cls3
2.Kernel Image(*.IMG)

Steps:


1. Turn off your phone and wait for 30 seconds.
2. Hold the right(3rd) button on your phone while inserting USB cable. The Blue LED light will blink. Now you are in fastboot mode.
3. Open Flashtool on your PC
4. Click on the thunder icon
5. Select Fastboot mode and click 'Ok'
6. Select 'Select Kernel to flash'
7. You can browse and select the Kernel Image file from the box
8. Flashing will start
9. Done! Your flashing is done


Few Kernel links which supports Custom ROM's

Suave V 6 (Neo V)- http://www.mediafire.com/?3ucv20pubc7c2um 
No Overclock Night elf Kernel-  http://www.mediafire.com/?0gj54wd38inprjs

Warning: I am not responsible for damage to your device, do at own risk!


Jayakumar
About the Author:
Jayakumar is the admin of the blog Sony Xperia Neo V. He is interested in trying new Custom ROM's and tricks on Android

Saturday, August 25, 2012

Taste the latest KA 22(ICS version) custom ROM on your Sony Xperia Neo V

KA 22 Ice Cream Sony

 Features:

- Pre-rooted
- Great Audio Improvement with clear bass
- 100% Supercharged

- Very battery friendly
- All Gapps updated {Included ones}

and many more....


Requirements:

1. Bootloader Unlocked
(See http://sonyxperianeov.blogspot.in/2012/06/bootloader-unlocking-via-easiest-way.html to unlock the bootloader)
2. Flashtool installed on your PC
(Click http://www.mediafire.com/?p65m2hqq0t5cls3 to install Flash tool for your Xperia)
3. ADB Drivers should be installed on your PC.If the drivers are not installed, Install Flashtool on your PC, open C:\Flashtool\drivers and click on the exe file to install drivers.


How to install:

Prerequisites:

1. Download ROM from :
http://www.xdafileserver.nl/Files/Sony%20%28Ericsson%29/SE%20Xperia%20NEO%20%28V%29/Ice%20Cream%20Sony/KA22_Ice_Cream_Sony_NeoandNeoV.zip and copy the ZIP file to a folder in SD card
2. Download Kernel(IMG file) from :
http://www.mediafire.com/?3ucv20pubc7c2um


You can have either Suave V6 or Night elf, both are compatible with KA ROMs


Steps:


1. Shutdown your phone and hold on the right button on phone while inserting USB cable, Blue LED will start to blink
2. Open Flashtool and click on thunder icon
3. Click on Fastboot and click 'OK'
4. Click on 'Select Kernel to flash'
5. Browse and click on the SuaveV6Neo.img (or night elf) and flash.
6. Safely remove fastboot from PC.
7. Power on mobile.
8. Enter in to CWM recovery mode (Press volume - button just after Sony Logo)
9. Do factory reset, Wipe the Dalvic cache and clear cache
10 Click on choose to install Zip from Sd card
12. Select ROM from the location which it was saved
13. Select Yes
14. Click Customize and Select 'Neo V'
15. Reboot phone
16. It will take around 5 minutes for first boot.

Your ROM is now installed...

Enjoy KA 22....
 

Screenshots:


Gallery:

Feature: Thumbnail size of gallery images can be varied by pinching over the screen in both directions.


Battery Backup in single charge:


Warning: Use these instructions at your own risk. We shall not hold any responsibility or liability for whatever happens to you or your device arising from your use of the info in this guide.


Sunday, August 19, 2012

A guide to flash CM9 ROM for your Bootloader unlocked Xperia Neo V


CyanogenMod is an aftermarket firmware for a number of cell phones based on the open-source Android operating system. It offers features not found in the official Android based firmwares of vendors of these cell phones

Pros:
  • Very Less Memory utilization(Just 19 MB used with out any external apps installed).
  • Smooth, stable and lot of features included in it.
  • Attractive boot animation and wallpapers added by default.
  • Three reboot options added in power off mode.
  • Fast and cool phone app. 
  • Screen can be adjusted to more brighter than stock ICS ROM.
  • CRT Off Animation while locking.

Cons:
  • Only one theme added in the ROM by default. You need to download extra themes from online. ( You can flash Nova 2.5 CM 9. It would have more themes in it and said to be more smooth than this ROM)


Requirements:

1) Take a Nandroid backup of your current ROM and Titanium backup of your data and apps( See http://sonyxperianeov.blogspot.in/2012/05/how-to-take-nandroid-backup-of-your.html to take Nandroid backup of your phone)
2) Export contacts to SD card for backup
2) Unlock the bootloader( Check http://sonyxperianeov.blogspot.in/2012/06/bootloader-unlocking-via-easiest-way.html to unlock your phone easily)
3) Must have CWM recovery installed ( See http://sonyxperianeov.blogspot.in/2012/05/how-to-take-nandroid-backup-of-your.html to install CWM recovery)


Steps how to flash the ROM:


 Step 1 -
Download ROM Zip from : http://mirror.sea.tdrevolution.net/jenkins/5806/cm-9.0.0-haida.zip
 and copy the zip file to sdcard.
Download GAPPS zip from :  http://goo.im/gapps/  and move that too in to any folder in SD card.
(download gapps-ics-20111230.zip from the list)

Step 2 -Flash the new kernel
Extract the files in Zip file to a folder on PC

Step 3: Install flash tool after downloading setup from : https://hotfile.com/dl/163801674/a1fa959/flashtool-0.9.0.0-windows.exe.html 

Step 4: Open Flash tool and  Click on Thunder icon
 - Click on fastboot mode and select 'Reboot in to fastboot mode via ADB'

Either put phone in fastboot mode (power off then click and hold button right to home and plug usb cable) and phone LED will light BLUE.

Step 5: Select 'Select Kernel to falsh' and select the boot.img to flash the kernel
Please wait till the kernel is flashed

Step 3:
Reboot the phone in CWM recovery then
Click on choose to install Zip from Sd card
Select the Zip file downloaded and install the ROM

Step 4:
 Wipe the Dalvic cache and data

Step 5:
Flash Gapps ZIP from CWM reovery like we did above.

Reboot phone
It will take around 5 minutes for first boot.
Your ROM is now installed

Screenshots:


Home Screen
Power menu


Add caption

Apollo- Music Player


Messaging

Settings


Disclaimer:-    Unlocking Bootloader will void the warranty of your phone. AUTHOR WILL NOT NOT RESPONSIBLE FOR ANY POSSIBLE DAMAGES TO YOUR PHONE CAUSED BY THIS METHOD. BY USING IT YOU AGREE TO ASSUME ALL RESPONSIBILITY FOR YOUR ACTIONS.

 
Design by Free WordPress Themes | Bloggerized by Lasantha - Premium Blogger Themes | Best Web Hosting